Matte Box and Filtration Guide: Trays, Stacking and Flare Control
Short answer
A matte box does two jobs: it holds filters larger than any lens front so they never vignette and work on every lens, and its top flag blocks off-axis light that would otherwise cause veiling flare. Stack diffusion closest to the lens and ND further out, with any polariser outermost so it can be rotated without disturbing the others.
A matte box is easy to dismiss as the thing that makes a camera look professional, and it does two concrete jobs that nothing else does. The Tilta Mirage Matte Box at around $102 is the box this guide assumes: it takes square trays and round filters, and it clamps to anything from 67mm to 82mm. The SmallRig Matte Box with 67 to 82mm Clamp at $43 is the cheapest honest way in.
The two jobs
Job one is holding filters. A 4x5.65 inch filter in a tray is larger than any lens front element you own, so it cannot vignette, it works on every lens regardless of thread size, and swapping it takes five seconds without touching the glass or unmounting anything. Compare that to screw-in filters, which need one per thread size or a bag of step rings, cannot be swapped mid-setup, and remove the ability to use a lens hood.
Job two is the flag. The hinged flag on top, sometimes called a French flag, blocks light arriving from above the frame that would otherwise strike the front element at an angle. That off-axis light does not form an image; it scatters inside the lens and lifts the black level across the whole frame. The result is veiling flare, which looks like nothing in particular and simply makes an image muddy.
Job two is the underrated one. On a backlit exterior, a flag properly set is doing more for contrast than any filter, and it costs nothing to use once the box is there.
Setting the flag properly
- Frame the shot first, at the widest focal length you will use in it.
- Look through the camera and lower the flag until it begins to appear at the top of the frame.
- Raise it just far enough that it disappears. That position is the maximum protection available.
- Check the corners specifically, because a flag entering the frame does so at the corners first.
- Re-check after any focal length change, since a wider lens sees more of the flag.
- On a zoom, set the flag at the widest end of the range you will actually use.
The most common mistake is setting the flag once and forgetting it, then zooming wider and finding a soft dark band across the top of a shot in the edit. Side flags exist on larger boxes for the same purpose horizontally, and the same procedure applies to them.
Stacking order
When more than one filter is in the path, the order changes the result. Diffusion goes closest to the lens and ND goes further out. Diffusion scatters light, and scattering light that has already been attenuated produces a more controlled bloom than attenuating light that has already been scattered.
A polariser, if you use one, goes outermost of all, because it needs rotating and rotating it should not disturb the others. Note that a variable ND already contains two polarisers, so adding a third to the same stack produces unpredictable interactions rather than more control.
Keep unused filters in their own trays rather than loose. A K&F Concept 4x5.65 Filter Tray spare at around $23 means the ND and the diffusion each live permanently mounted, so changing between them is a swap rather than an unmounting operation with fingerprints and dust involved.
Boxes and trays
$23 to $299. The flexible mid box, a spare tray so two filters stay loaded, and a 114mm carbon box for large-front cine glass.
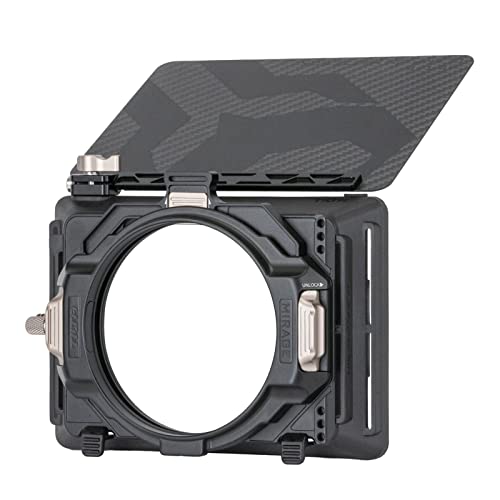
Tilta
Tilta Mirage Matte Box
Takes both 4x5.65 trays and 95mm circular filters with adapter rings down to 67mm, so one box covers a whole mixed set of lenses.
- Filters
- 4x5.65 and 95mm round
- Rings
- 67 to 82 mm
The pick for a small narrative kit.
Check price
K&F CONCEPT
K&F Concept 4x5.65 Filter Tray
A spare tray means the diffusion and the ND both stay mounted, so a change is a swap rather than a rebuild.
- Size
- 4 x 5.65 in

Tilta
Tilta Mirage Pro 114mm Matte Box
Carbon fibre with a 114mm backing, which is the size cine primes and zooms actually need once the front diameter grows past 95mm.
- Backing
- 114 mm
- Body
- Carbon fibre
Pointless on small mirrorless glass.
Check priceClamp-on or rod-mounted
| Consideration | Clamp-on | Rod-mounted |
|---|---|---|
| Weight on the lens | All of it | None, carried by rods |
| Lens change | Remove and refit the box | Untouched |
| Extra rigging needed | None | Baseplate and rods, about $50 |
| Alignment | Automatic, it moves with the lens | Must be set, and reset for lens length |
| Maximum size | Limited by what the thread will carry | Large boxes, several trays |
| Best for | Run and gun with one or two lenses | Narrative with a matched set |
The lens change row is the practical decider. On a narrative shoot with a matched prime set, a rod-mounted box stays put and a lens change takes thirty seconds. With a clamp-on box the same change means unclamping, changing, reclamping and rechecking the flag, which is several minutes with a crew waiting.
Backing size, which catches people out
The backing is the diameter of the opening the box presents to the lens, and it is a hard limit. A box with an 80mm backing cannot clamp onto a lens with a 95mm front, and no adapter ring solves it because the opening itself is too small.
Check the front diameter of the largest lens you own or plan to own before choosing a box. Cine primes commonly have 95mm or 114mm fronts, which is why the Tilta Mirage Pro 114mm Matte Box exists with a 114mm backing, and why buying a small box and then buying cine glass is a common sequence that ends with buying a second box.
On the other end, a very large box on small stills lenses is not wrong but it is heavy, and the space between the lens front and the box interior can allow light to enter behind the filters. Some boxes ship with donut seals for exactly this reason, and they are worth using.
When a screw-in filter is the better choice
On a gimbal, almost always. A matte box is several hundred grams positioned high and forward, which is the worst place on a rig to add mass, and it can foul the gimbal's tilt travel. A screw-in variable ND like the K&F Concept 82mm Variable ND, 1 to 5 Stops weighs a fraction as much and does the exposure job.
On a run and gun rig with one zoom, usually. The lens hood does part of the flag job, a screw-in filter does the ND job, and the whole matte box assembly is weight and setup time in exchange for benefits you will use occasionally.
On a body with internal ND, the strongest reason for a box disappears entirely. What remains is the flag and the ability to run diffusion in a tray, both real and neither urgent. This is one of several places where internal ND quietly saves money that never appears in a camera comparison.
Next, from here
- Best matte boxes
The boxes themselves, compared.
- Best diffusion filters
The tray filter people buy a box for.
- Best variable ND filters
The screw-in alternative.
- Variable versus fixed ND
Which belongs in the tray.
- Filter thread size chart
Threads, backings and step rings.
- 15mm versus 19mm rods
What a rod-mounted box clamps to.
Common questions
- What does a matte box actually do?
- Two things. It holds filters larger than any lens front element, so they never vignette, work on every lens regardless of thread size, and swap in seconds. And its top flag blocks off-axis light that would otherwise scatter inside the lens and lift the black level across the frame, which is veiling flare. The second job is the underrated one on backlit exteriors.
- What order should filters go in a matte box?
- Diffusion closest to the lens, ND further out, and any polariser outermost so it can be rotated without disturbing the others. Diffusion scatters light, and scattering already-attenuated light gives a more controlled bloom than the reverse. Remember that a variable ND already contains two polarisers, so adding a third produces unpredictable interactions.
- How do I set the top flag on a matte box?
- Frame the shot at the widest focal length you will use, look through the camera, and lower the flag until it just begins to appear at the top of the frame, then raise it slightly until it disappears. That is maximum protection. Check the corners specifically, since the flag enters there first, and reset it after any change to a wider focal length.
- What is matte box backing size?
- The diameter of the opening the box presents to the lens, and it is a hard limit rather than something an adapter can fix. A box with an 80mm backing cannot clamp onto a lens with a 95mm front. Cine primes frequently have 95mm or 114mm fronts, so check the largest lens you own or plan to own before choosing a box.
- Should I use a matte box on a gimbal?
- Usually not. A matte box is several hundred grams positioned high and forward, which is the worst place on a rig to add mass for a stabiliser, and it can foul the tilt travel. A screw-in variable ND weighs a fraction as much and covers the exposure job. Check your numbers on the payload calculator before committing to one on a stabilised build.
- Do I need a matte box if my camera has internal ND?
- Much less. Internal ND removes the strongest reason to own one, since it never vignettes and works on every lens. What remains is the flag for backlit shots and the ability to run diffusion in a tray. Both are worth having and neither is urgent, which means the purchase can wait until something in your work specifically calls for it.
Totalling your own rig weight against your gimbal payload? The Camera Rig Build Planner is the paid version of these pages: 8 printable worksheets you fill in with your own numbers, plus the full PDF, $29.