Best Shoulder Rigs for Video Cameras in 2026
Short answer
The best shoulder rig for most people is the SmallRig Classic Shoulder Rig Kit at around $170, because it puts the weight on your shoulder and gives both hands a grip at a natural distance, which is what actually steadies a handheld shot. Under $100 the SmallRig Universal Basic kit at $100 covers the same idea with fewer adjustments.
A shoulder rig is a stabilisation method, not an accessory. The SmallRig Classic Shoulder Rig Kit at around $170 is the pick because it gets the three things right that matter: a pad that sits on the shoulder rather than the collarbone, rods at the correct height, and grips far enough forward that your elbows tuck into your ribs. The SmallRig Universal Basic Shoulder Mount Kit at $100 is the same idea more simply, and above those the Tilta Lightweight Shoulder Rig at $288 adds proper rosettes and adjustability.
Why a shoulder rig works, in one paragraph
Handheld shake comes from your body having only two contact points with the camera, both of them at the end of unsupported arms. A shoulder rig adds a third contact point and moves the load onto your skeleton rather than your muscles. With the pad on your shoulder, both hands on grips and both elbows braced against your ribs, the camera is held in a closed triangle, and a triangle does not wobble the way two floating hands do.
That is also why the counterweight matters. A rig balanced so that the camera hangs forward means your hands are supporting the front end continuously, and arms tire. A rig balanced so the weight sits over the shoulder, with a battery at the back doing the counterbalancing, sits there almost by itself and your hands only steer.
This is why V-mount batteries and shoulder rigs are so often bought together. The battery on a plate at the rear is not just power, it is the counterweight that makes the whole system work.
Shoulder rigs
$100 to $288. All three do the same job. The differences are adjustability, rosette quality and how much the pad actually contours to a shoulder.

SMALLRIG
SmallRig Universal Basic Shoulder Mount Kit
A shoulder pad, rods and handles, which is the cheapest way to move a camera's weight off your wrists and onto your body.
- Rods
- 15 mm
Basic, and genuinely enough to start.
Check price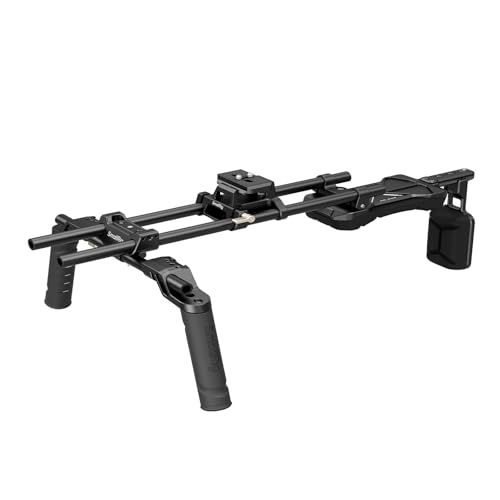
SMALLRIG
SmallRig Classic Shoulder Rig Kit
A 2.98 lb rig with proper counterbalance behind the shoulder, and rear weight is what actually makes handheld steady rather than merely heavy.
- Weight
- 2.98 lb
The value pick for documentary handheld.
Check price
Tilta
Tilta Lightweight Shoulder Rig
Folds down for transport with dual quick releases, so the same camera can go shoulder to tripod without unbolting anything.
- Feature
- Foldable, dual QR
For operators who move between setups fast.
Check priceWhen a shoulder rig is the wrong purchase
On a light rig it is often worse than nothing. A bare mirrorless body weighs a couple of pounds, and a shoulder rig adds a similar amount while making the whole assembly larger and slower to deploy. Below roughly 5 lb of camera, a NATO top handle and two hands close to your body is steadier and packs far smaller, which is exactly why the run and gun starter build has no shoulder rig on it.
It is also wrong for anything eye-level and static. A shoulder rig positions the camera at shoulder height, which is below eye level for most people, and raising it defeats the whole mechanism. If your shots are locked off or on a tripod, this is not a purchase.
And it is wrong for gimbal work. A gimbal already decouples the camera from your body, and a shoulder rig cannot mount to it. The support you want there is a dual handle or a vest, which is a different product solving a different fatigue problem.
Shoulder rig, gimbal or vest
| Method | What it removes | What it costs | Best for |
|---|---|---|---|
| Top handle and two hands | Nothing, but adds no weight | Under $30 | Light rigs, fast documentary work |
| Shoulder rig | Small tremor and arm fatigue | $100 to $290 | Heavy rigs, deliberate handheld movement |
| Gimbal | Rotational shake entirely | $200 to $1,100 | Walking shots, moving with a subject |
| Gimbal plus dual handle | Rotational shake, with the load shared | $250 to $1,300 | Longer gimbal takes |
| Gimbal plus support vest | Rotational shake and most of the fatigue | $320 and up | All day gimbal operating |
| Dual handle support system | Vertical bounce as well as tremor | $1,299 | Professional handheld with a heavy build |
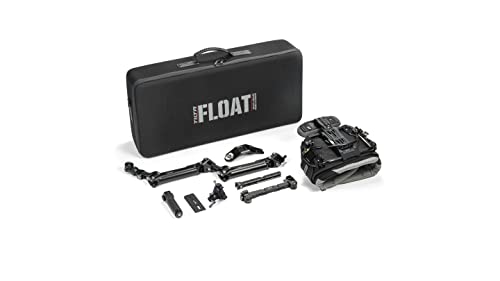
The Tilta Float Dual Handle Support System on that last row is a genuinely different category. It is a spring-arm support system rather than a shoulder pad, and it absorbs the vertical bounce of walking, which neither a shoulder rig nor a three axis gimbal does. It costs $1,299 and it solves the one problem that has no cheap fix.
Body support for heavier work
$119 to $1,299. A vest and a dual handle for gimbal fatigue, and a spring-arm system for the vertical bounce nothing else removes.
Tilta
Tilta Float Dual Handle Support System
A spring-arm and vest system that takes a heavy build off the shoulder entirely, which is how a long handheld day stops ending in back pain.
- Type
- Arm and vest
Expensive, and transformative for long days.
Check price
Tilta
Tilta Lightweight Gimbal Support Vest
Moves a gimbal's weight to your hips, which is the cheapest fix for the real limit on gimbal work, which is your arms and not the motors.
- For
- DJI RS series
Buy this before a bigger gimbal.
Check price
Tilta
Tilta Lightweight Dual Handle Gimbal Support
A dual handle bar that spreads a gimbal across both arms, which steadies low-mode moves far more than any motor setting will.
- For
- DJI RS series
Adds bulk to a small gimbal.
Check priceSetting a shoulder rig up so it does not hurt
- Set the shoulder pad so it sits on the flat of the shoulder, not on the collarbone. Most people mount it too far forward.
- Balance the rig front to back so it wants to sit level with your hands off the grips. Add a battery at the rear if it noses down.
- Set the grip distance so your elbows tuck against your ribs. Grips too far forward is the most common setup error and it removes the bracing that makes the whole thing work.
- Set the grip angle with rosettes so your wrists are neutral. A bent wrist under load fails within minutes.
- Put the viewfinder or monitor where your eye naturally falls, not where there is space on the rig.
- Check the whole assembly with the camera you actually use, loaded, before a shoot rather than on the day.
The balance step is where a SmallRig VB99 Mini V-Mount, 99Wh on a SmallRig Foldable V-Mount Battery Plate earns its place twice over. It powers the whole rig and it puts roughly a pound behind your shoulder, which is exactly where a front-heavy handheld build needs it.
What to add, and in what order
Rods first, if the kit did not include them. A SmallRig 15mm Carbon Fibre Rods, 12 inch pair pair at around $21 in carbon fibre keeps the front end light, and the rods are what the matte box, the follow focus and the lens support all clamp to.
A rosette arm second. A SmallRig 7-inch Rosette Magic Arm at around $35 lets you set the grip angle rather than accepting whatever the rig came with, and wrist angle is the difference between comfortable for an hour and painful for ten minutes.
A monitor mount third, and put it on a NATO clamp rather than a cold shoe. On a shoulder rig the monitor sits close to your eye and takes constant small knocks, and a SmallRig Monitor Mount with NATO Clamp at $32 is what stops it slowly rotating out of position through the day.
How we chose
These picks come from published dimensions and materials, stated rod spacing and rosette standards, and verified owner reviews describing comfort and balance over long days. We did not have every one of these rigs in our hands and will not pretend otherwise.
The criteria in order: whether the pad contours to a shoulder or is a flat block, how much the grip distance and angle adjust, whether the rod height matches standard lens centres, and how well the rig balances once a battery is added at the rear.
Next, from here
- Gimbal versus shoulder rig
The full head to head, by shot type.
- Handheld shooting guide
Technique that costs nothing and helps more.
- Best V-mount batteries
Power and rear counterweight in one purchase.
- Best gimbals
The other answer to camera movement.
- Run and gun pro build
Where body support becomes a line item.
- 15mm versus 19mm rods
Which rod standard your rig should use.
Common questions
- Does a shoulder rig actually make footage steadier?
- Yes, on a heavy enough rig, because it gives your body three contact points instead of two and puts the load on your skeleton rather than your arms. With the pad on the shoulder, both hands on grips and both elbows braced on your ribs, the camera sits in a closed triangle. On a light rig the added bulk outweighs the benefit and a top handle held close to the body is steadier.
- At what camera weight does a shoulder rig start to make sense?
- Around 5 lb of loaded rig. Below that, a NATO top handle and two hands held close to your body is steadier, faster to deploy and packs far smaller. Above it, arm fatigue starts limiting take length before anything else does, and moving the load onto your shoulder is the fix. A cinema body with a zoom and a matte box is comfortably above the threshold.
- Shoulder rig or gimbal?
- They solve different problems. A gimbal removes rotational shake, which is what makes walking shots viewable, but it does not remove the vertical bounce of your stride and it needs rebalancing after every load change. A shoulder rig removes small tremor and fatigue while keeping the camera coupled to your body, which is what gives handheld footage its deliberate quality. Many working kits carry both.
- Why does my shoulder rig hurt after ten minutes?
- Almost always because the grips are too far forward, so your elbows cannot tuck against your ribs and your arms carry the front of the rig continuously. Bring the grips back until your elbows brace. The second cause is a rig that is nose heavy, which a battery on a rear V-mount plate fixes while also powering the camera. The third is wrist angle, which rosettes exist to adjust.
- Do I need a counterweight on a shoulder rig?
- You need rearward weight, which is usually better provided by a battery than by dead metal. A V-mount cell on a rear plate adds roughly a pound behind the shoulder, balances a front-heavy build so it sits level with your hands off the grips, and powers the camera and monitor at the same time. That is why V-mount power and shoulder rigs are so often bought together.
- Can I use a shoulder rig with a gimbal?
- No, they are incompatible approaches. A gimbal decouples the camera from your body deliberately, which is the opposite of what a shoulder rig does, and there is no sensible way to mount one to the other. What you want for gimbal fatigue is a dual handle so both arms share the load, or a support vest that transfers the mass to your hips.
Totalling your own rig weight against your gimbal payload? The Camera Rig Build Planner is the paid version of these pages: 8 printable worksheets you fill in with your own numbers, plus the full PDF, $29.